Followers

Monday, 3 February 2014

Marionette Monday

Well hello and how was your weekend? ...ours started off with the lock on our front door jamming on Friday.....it would not budge...the key wouldn't work, so all weekend we had to use the back door....and Adam finished work at 5am....!!!!!
We did manage to get a very good local locksmith to come and have a look today...and after some head shaking, some tutting and some 'well, I thought that would have worked!,' .....and many pennies later we have a new lock, new keys and more to the point a front door that I can open.....yah....
Anyway yesterday was Clarity Sunday ....did you manage to watch any of the shows? ....yes Mum ...I know you did....thanks for watching....
Oh I do love to see Nigel with Barbara ...they make a great team and Nigel was so funny. I think he is ready to move in with fellow DT member Lynne....well she does make exceedingly good cards....
It was great to see all the fabulous designs ...and if you missed them you can always find inspiration on the website.....
 http://www.claritystamp.co.uk/ 
As for me, I loved working with the Marionette stamps and stencil...


This was one of my cards, I used the stencil, sail boat blue Adirondack ink and the brilliant stencil brushes...the Marionettes were stamped in Memento ink and coloured with Graph It markers...


I stamped the hands, coloured them in and cut around the fingers....then added some small wooden sticks...
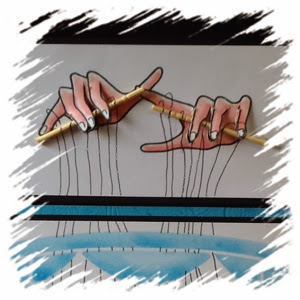

The strings were drawn free hand with a fine liner pen...it's quite spooky how real the hands look...
Right, I'm off to cook some food ....hungry boys and all that....
Thanks for taking the time to read this and leave comments...I do love to read them...and welcome to our new followers...so good to have you join us....
Call back soon...
Jo. X 

Saturday, 1 February 2014

Love and Romance...

Well it's the month of all things Valentine....
Good morning...welcome to a new month and a new Challenge over at the Clarity Challenge Blog....
Well Done to last months winner...oh, we had some super entries...I do hope you get chance to pop over and have a look...really inspirational.
On to today...and our new theme is 
 Love and Romance...
Here is my take on the theme.....
I thought I would go for something different to the usual hearts....or flowers...


I started with the brilliant Letter box kit and Archival ink....I worked my spacings out on copier paper first...


Then stamped the lovely little Bunnies and used a mask for the moon with Adirondack ink, Cloudy Blue.


Some Pesto Adirondack ink to ground the bunnies...


Then some tree branches in the corner ....and two little birds...these stamps are from the remountable English Garden set...


I added some colour to the bunnies with my alcohol markers....


Then some gentle shading with a sponge under the words and I just had to use some cotton wool for their tails.....well it just had to be done!!!


Here is a close up...


I do hope that you like it and that it inspires you to join in....the other DT members have come up with some fab ideas too....have a look...and remember the winner gets a £50 Clarity gift voucher....


Quick reminder too, that Barbara is on C&C on Sunday with the fabulous Clarity shows....9-11am and 2-3pm


Have a great weekend...
Crafty hugs....
Jo. xxx

Wednesday, 29 January 2014

Love in a box....

Morning all....how is your week going?
I finally finished my next lot of Clarity samples yesterday and got them in the post....oh some great new stencils and stamps.......in fact they will 'tug at your strings!!!!!'
You will see on Sunday......remember to watch.....
I'm just about to walk Tess and then take Karl off to the station as he is off to London....
So what did you come here for today....oh yes....something to look at....
So here is a little Love box that I made with the Stamps from last months TV shows....


The two sea horses had to be involved....oh heads up ladies ....we are using them next Wednesday.....yah....


The inside of the box was also decorated and the tissue....well we so need attention to detail....


Then inside I had made some love cards......oh....


And all together we have Love on a box.....
Thanks for looking in and have a go day.....need to dash.....
Bye....stay warm it is going to get cold....
Hugs......Jo. X 

Sunday, 26 January 2014

It's been a Gelli weekend

It certainly has and it started on Friday with a few hours playing...oh sorry, preparing for Saturdays workshop at C.J.Cardcrafts in Edgeley, Stockport.
I used one of the fantastic new Clarity Stencils.....well I do love Poppies....


I started by loading my Gelli plate with a pale colour of Adirondack ink using my Brayer. I then used scrumpled paper and took a print. Added two contrasting inks and one of the outer square stencils....rubbed with copier paper, took the stencil away and took another print....this is a really good way to build up layers on a background.
When I was happy with my background, I placed my poppy stencil onto the Gelli plate and began to dab Adirondack ink through the stencil using a makeup sponge....


I removed the stencil and took my final print....I was really happy with the result, so I made it into a card.....I do hope that you like it too.


Here are some other examples using the Gelli plate, inks and Clarity Stencils...


And..


On to the workshop projects....we had some warm up exercises using copier paper...I really do recommende this...and once you start, honestly you won't want to stop...


We used the Clarity Treescape stencil and the stamps are from the remountable hares set....


Then onto a more arty approach to the Gelli plate (just for you Sam).
I do hope you like these projects, the crafters all took to the Gelli like ducks to water...(and believe me we have a lot of water about at the mo...) 
Thank you for looking in today...enjoy your Sunday evening especially you Linda Page!!!! I know what you will be doing at 9pm.......Enjoy...
Hugs from me....xxx

Thursday, 23 January 2014

Foxgloves

First of all I would like to say  a warm welcome to our two new followers...do pull up a chair, grab a cuppa and relax...thank you for joining me on this crafty journey.....
Yesterday was workshop day in Hazel Grove, Stockport and we used a lovely set of Clarity Stamps....the Foxgloves....


The first card was stamped in black Memento ink and coloured with alcohol markers...the sky was created with tumbled glass Distress ink, the cloud mask and a stencil brush.....now ...have you tried the new Clarity stencil brushes? They really are fabulous, so easy to use and get a really good result...
The bee is from the Remountable bugs set from Clarity and is such a useful little set of stamps....
Glossy accents adds the finishing touches...
For the second card, I thought we would go for a different look...


The reverse side of Centura Pearl was used and Distress inks, Peacock Feathers, Mowed lawn and Spiced Marmadale...some sequin waste and spritzing with water....this is a really quick way to make a background.
The foxgloves were stamped using black  Versafine ink ...(a waterproof ink).
To colour them we put some distress ink onto a heat resistant mat, next to some water and then a small amount of pearl, Perfect Pearls.....
Water coloured the flowers......by adding the perfect pearls the colour dries to a gorgeous shinny finish....
The sentiment is from Clarity and the dragonfly is from the Remountable Bugs set of Claritystamps...
Once  again, it was lovely to spend time with crafty friends and as always we did have a laugh...and thanks to the Crafty Fairy....(Eileen you know what I mean..xxxx)
Thanks for looking in today ....and I hope you have enjoyed sharing what we created....hugs....Jo. X 

Monday, 20 January 2014

Busy weekend

Well yes that was a busy weekend, on Saturday I went to Crafts 4 U 2 Do in St Helens. We made a wall hanging using three of the MDF butterflies from none other than the MDF man....
We started by covering them with some fabulous Graphic 45 papers and cutting them out....some sanding and gilding...


Then we made some embellishments with die cuts, Clarity stamps and some Sweet Lilac flowers.


More gilding,


More cutting out, some lunch, (and yummy cakes ...thanks Lisa).


Then the best bit...time to play and decorate the butterflies....what to glue where....
Some ribbon and job done...Thanks for your company ladies ...and Chris, you still make the best coffee....
Then there was Sunday...a few of us went along to help Maria Simms move into her new Craft Unit....the Maria Craft Hub....although, I'm not sure if that is the official name....oh my ....just how much craft stash can one person have!!!!! It does look fab though....A great place for workshops.....
We did work hard although this is the only photo that I have!!!!!


I'm off now.....so much to catch up on this week....
Enjoy your evening....
Jo. X 

Thursday, 16 January 2014

All About Love

Good morning all, hope you are well...things still a bit up and down here but better than they were.
Today it's a new Challenge over on the Sweet Lilac Blog...and the new theme...especially with Valentines day in mind is....All about Love....
I must thank all the crafters who entered last months challenge and congratulations to the winner...remember you can win a hamper full of lovely flowers from Sweet Lilac...
Now I did have fun creating a tag for this Challenge....a tag from The MDF man himself ...Thanks Rob.....
You can see all the fabulous MDF products here....


This technique was demonstrated by Rob at the NEC last November and I have used it so many times since...


Firstly cover the MDF with pva glue and spread it out evenly with your fingers....


Then place it glue side down on to a sheet of paper...I choose a stunning piece from Graphic 45


Carefully cut around with your craft knife....I have found that having a glass cutting mat underneath really helps...(thanks for the advice Paul Church) 
Then a light sanding over the edges....


On a piece of white card I stamped the letters, I and U using the letter box kit from Claritystamps using Archival ink - plum


I then used VersaMark ink and clear embossing powder and created little tiles by repeating the process three times...these were cut out.


I used Aged Mahogany Distress ink around the edges of the tag and randomly stamped the music stamp from Claritystamps.
Sweet Lilac also sell some gorgeous lace, so I just had to add some along the lower edge..


I used some coordinating rose heads to make a heart...top tip, try your spacing before you glue them down. (now how do I know this???) 


Some ribbon and a metal embellishment and my tag was finished...I do hope you like it...


Now you've had some inspiration why don't you make a project and enter our Challenge....
Just pop along to the blog and check out the other DT projects ...they are brill.
And remember you could win a hamper of flowers...
I'm off now to do the weekly food shop.....not my favourite job....I would rather be buying craft goodies...
Catch you soon...Hugs, Jo. X